Home built modular power system for emergency and UPS applications - Part 3
This article runs over the basics of generating and storing electricity for use as a stand alone or emergency back up system. It uses commonly available parts, and anyone can put such a system together if they so wish. Many parts can be found second hand, or bought cheaply.
Controlling the system
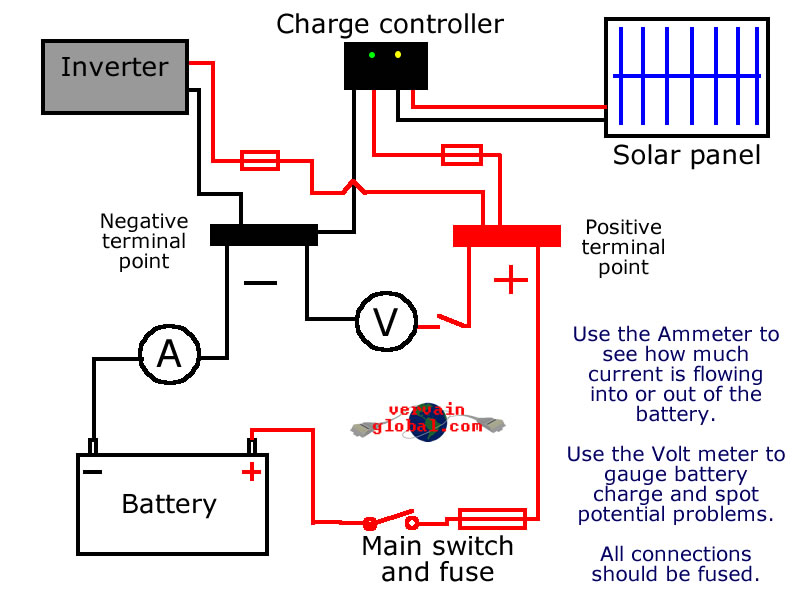
So now we have our solar panels and/or wind turbine. We have a battery or two for energy storage. We have an inverter to convert power into something that our domestic appliances can make use of. Now we need to wire it all together, and we need to do it in a safe way that allows us to control everything properly. Here we will use switches, fuses and meters to keep our system in check. The diagram shown below demonstrates a simple wiring configuration.

In the diagram, all connections join to the large terminal blocks. This is much safer than wiring directly onto the battery terminals, as it allows us to install an emergency isolator and main fuse. Let's take a look at each component in the diagram (This diagram is modelled on the basic system that is explained in the Power system rundown article).
- The main switch. This essential switch is a must have emergency shutdown in case something goes seriously wrong. If a major short circuit occurs, or the inverter fails, you will need to stop the power quickly. It is actually advisable to have a switch both on the positive and negative sides. These switches must be able to cope with the huge currents that may flow from the battery.
- The fuses. It is very important that every device connected to the system has an appropriate fuse in line. Fuses are normally fitted on the positive rail, mainly because this is standard practice in the automotive industry, where the metalwork of cars are grounded to the negative battery terminal. This is the same for metal objects, such as the inverter's casing. The main fuse must be large enough to cope with all of your equipment running at full load, but still blow should a short circuit occur.
- The Ammeter. This is not an essential component, but one I'd recommend. This little meter comes in handy when trying to figure out how fast your battery is charging, or how much power an appliance is using.
- The Volt meter. Again, not an essential component. This meter will let you know roughly how much charge the battery is holding. It offers a quick check to see if your system is ready to go or not. It can also be used to identify certain faults, like a poor connection or a faulty charge controller that is allowing your battery to overcharge.
- The charge controller. This is a very important device if you are using solar panels of more than a few watts. It prevents your battery from being destroyed when the sun is out a lot and you are not using power. This device simply stops the current from the solar panels when the batteries are full, and starts it again when they begin to be used.

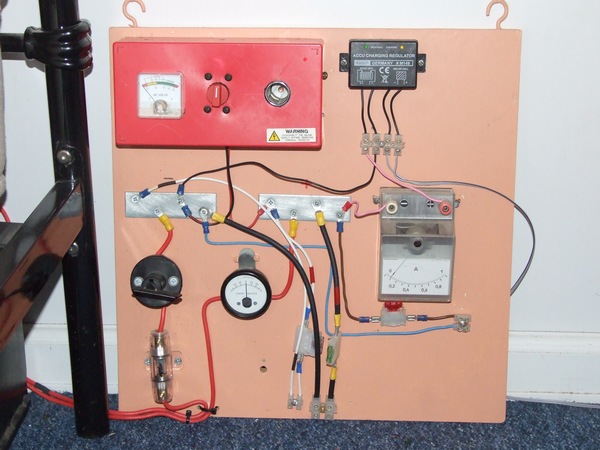
When wiring the system together, make sure that all cables used are large enough to cope with the currents that may be drawn. Because of the low voltages involved, devices that need a lot of power will draw very large currents. If cables are too small, they will quickly melt and potentially short out. Check to see what size cable you'll need for your system. The solar panel and charge controller can generally be wired in thinner cable, as less current is involved. The main battery connections and inverter connections will need to be in suitably large cable, to prevent cable melt down and fire risks. When wiring, make sure that you connect all the cables the right way round (polarity). All positive cables to positive, all negative to negative etc. This is very important, so check twice, three times if you must! To learn more about the control panel shown in the picture, please check out power system rundown.
Once you have wired everything together and mounted it onto a piece of wood or similar, its time to test everything out. Turn all switches off, leave all fuses out except the main fuse, and connect your battery to the system. If you get sparking at this point, something is very wrong and you need to check your wiring. If the connections go on with no sparking, try switching the main switch on. The Ammeter shouldn't move at this point, but your volt meter should read at around 12-13 volts. If this is the case, you can try inserting fuses one by one. Make absolutely sure that all wiring is of the correct polarity (positive to positive, negative to negative). Most equipment will be destroyed if you get this wrong. The inverter fuse may spark a little. This is normal. The inverter contains large capacitors that will charge when first powered up.
Once all of your fuses are in, spend a few minutes watching and listening carefully. The Ammeter should still read at zero, unless your solar panels are charging into the battery. Try out the inverter with a small load, like a lamp. It should light up and show a current on the Ammeter. If you'd like to figure out how much power the load is using, why not check out The basics of electricity. You may notice that the volt meter drops slightly when you are using lots of power, and this is a good demonstration of voltage loss across cabling. If the voltage is dropping a lot, you probably need to install bigger cabling. None of the cables should ever get hot during use.
Once everything is tested and safe, you will have your own stand alone power system. Your solar panels or wind turbine will charge the batteries automatically for you, so you need only check everything is working once every few weeks. You can now alter and add to it however you please, but remember to keep everything secure and safe. Happy tinkering!
